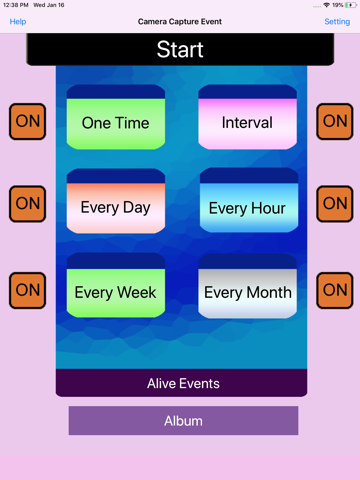
Powerful and easy to manage the camera action. Enable the iCloud for our device album, the photo or video made from this app will be uploaded to our iCloud.
The app could take photo or record video at the indicted time.
It includes six camera capture events.
The one time capture event could record the video or take photo at the specific time.
The interval timer could record the video or take photo every interval minutes. The interval duration could be 10 minutes or event 2 minutes. However, we need to be patient in order to wait the job list made. Because less duration, mean that more jobs will be made. So it will take a lot of time to make job for 10 minutes work within one month, and it will take more time to make job for 5 minutes work within one month. For example, if we take photo every minute, then in this last edition,for the interval events, the jobs in 30 days will be created. So the number of jobs will be 30 * 1024, so it need more than 10 minutes to insert these jobs to the database.
The every hour event could record the video or take photo at the indicted minutes every hour. In this last edition, for every hour event, the jobs in 30 days will be created.
The every day event could record the video or take photo at the indicted hour and minute every day.In this last edition, for every day event, the jobs in 365 days will be created.
The every week event could record the video or take photo at the indicted week day and at the indicted hour and minutes.In this last edition, for every week event, the jobs in 365 days will be created.
Basic Usage:
When we first launch this app, its database is empty.So we need to add our own event first.
Step 1: Decide which kinds of camera capture event we need to add. If we want to add every hour event, then tap Every Hour button in the main view. Then, the Every Hour Event list view will be displayed.
Step 2: Tap the add button at the bottom of the view, after that, we will see the view for adding the every hour event. In this view, we could pick which minute the action will start. Then select to take photo or record the video. After that, Tap the save button at the upper left corner.
Step 3:At last, we will see one row in the every hour event list. And tap the start button, we will see the job list. Because in this latest edition, in the job list, more job items will be created , so we have to wait longer time until the job list is created.
Advanced Usage:
In the main view, beside the event button, is the status button of the event. For example, if the button on the right side of Every hour event button is ON, then every hour sound recorder event is alive. When we tap the start button, the alive event will run. If the status button is OFF, then every hour sound recorder is sleep.
Notice
If the two jobs from different events are overlaid in time, then one of them will be ignored or dismissed.
If the first job is video record, then the stop time of the first job should be at least 1.5 minute earlier than the start time of the second job.
Features
1.Record the video
2.Take photos
3 One time event scheduler
4 Interval Event scheduler
5 Every hour event scheduler
6.Every Day Event scheduler
7.Every Week Event Scheduler
8.Every Month Event Scheduler
9.Different Event could select the rear camera and front camera
10.Different event could select the high quality file or standard quality file
11 Different event could turn ON or OFF camera flash.
Example:Every Week Event
From the main view, tap the every week event button, then the every week event list view will be displayed. Then tap the add button at the bottom tool bar. So new record view will be displayed. Select the action type: record video or take photos. If record video, then we could indict the duration of video. According to our preferences, we could select the camera type , file quality or flash status. Finally, tap the save button. The new every week event record will be displayed in the list.


